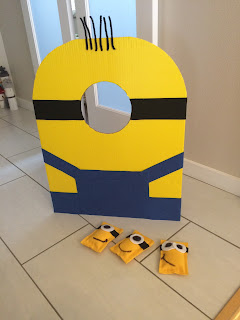
You will need just a few things to make this:
- Thick Poster board
- Scissors or utility knife
- 2 felt sheets in blue, black, yellow, and 1 white sheet.
- 3 or 4 black pipe cleaners
- Hot glue gun
- Pencil/pen
- Rice or beans (or whatever you want to fill your bags with).
Step 1: Cut top two corners to make head shape
Step 2: Trace circle and cut out hole. I used a small kids plate to trace my circle.
Step 3: Cut out 2 strips of black felt, and 4 blue strips for the overalls. The center portion of the overalls is one full sheet. (Sorry, I don't have pictures of the strips before I glued them on).
After you have everything cut out and laid out where it needs to be, glue it onto the board. Hot glue gun works great for this.
For the little hair pieces, I used some black pipe cleaners I had laying around. I cut them into thirds and hot glued them as well.
Once everything was glued and dried, I taped two 2 liter pop bottles the back to prop it up. I filled the bottles about half way with water, that way it wouldn't tip over so easy when the kids threw the bags at it. I just used duct tape for that. It worked great!
- Cut out 6 yellow rectangles, 3 black strips, 4 white circles, and 4 smaller black circles.
- Glue black strip onto yellow rectangle.
- Glue black circle onto white circle. (makes the eyes)
- Glue eyes over black strip.
- Use a black pen or marker to draw mouth.
- Start to glue 2 of the yellow rectangles together, only glue 3 sides at first so that you can fill the bag with rice or beans, or whatever it is you are using. Once you have it filled, then glue the fourth and final side together.
That's it! Now all you have left to do is get your kiddos and enjoy the game!


No comments:
Post a Comment